
MQTT communication is major enough to be referred to as the de facto standard as a communication system between IoT devices. I wrote this article for beginners and also as a memo for me.
MQTT (Message Queuing Telemetry Transport) is a communication standard designed as a lightweight protocol, which can keep TCP/IP connection even under an unstable state.
This page shows how to do MQTT communication in a local environment with PC, Raspberry Pi, and Android smart phone/tablet.
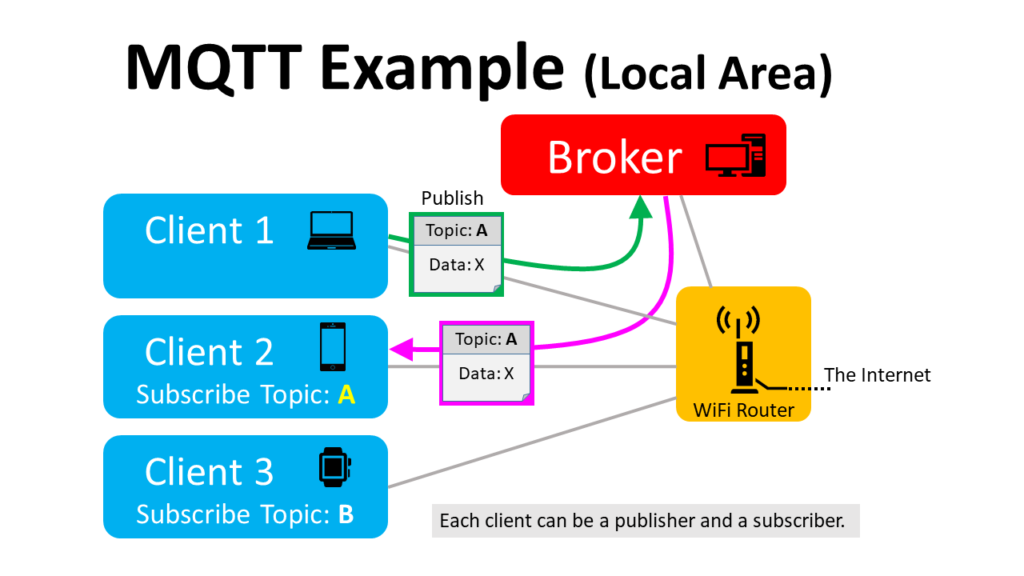
In MQTT, as shown below, there are one Broker (server) and multiple Clients. When one of the Clients publish data with a particular topic, another Client that subscribes the topic receives the data.
In order to begin the MQTT, you must make a Broker first.
MQTT is an open communication standard and there are various Broker software.
I introduce the way to build the Mosquitto environment (the reference MQTT environment) on PCs, Raspberry Pi, and so on, and MQTT applications for mobile and tablet devices.
Windows PC
This section describes how to install the Mosquitto to the Windows PC.
Download the Windows Installer (mosquitto-*-install-windows-x*.exe) and install it.
https://mosquitto.org/download/
Since the readme says the OpenSSL is required, download the installer (Win*OpenSSL_Light-*.exe ) from the following page and install it.
During the installation, there is a choice of installation location. Select the Windows system folder (default).
http://slproweb.com/products/Win32OpenSSL.html
Add the path to the Mosquitto installation folder, next.
Open the Control Panel with inputting ‘cont’ in the search window of the Windows menu bar.
Then add the Mosquitto installation folder (C:\Program Files\mosquitto).
Confirmation execution
Let’s check the execution of Mosquitto.
Launch the command prompt by typing ‘cmd’ in the search window of the Windows menu bar, or launch the Windows PowerShell by typing ‘powershell’, and run the command below.
mosquitto
Nothing happens, but the Mosquitto will start.
Then, launch another command prompt or PowerShell, and launch the Subscriber to be the first Client with the following command.
mosquitto_sub -d -t topicA
In addition, launch another command prompt or PowerShell as a second Client, and then try to Publish.
mosquitto_pub -d -t topicA -m "Hello world!"
If you see the following message on the subscriber window, the MQTT communication was succeeded.
Client mosqsub|6456-user-PC received PUBLISH (d0, q0, r0, m0, 'topicA', ... (12 bytes))
Hello world!
Mosquitto and mosquitto_sub will be stopped with Ctrl+C.
Communication with other devices
Now that you have a confirmation of MQTT communication on a PC in the above, then let’s try to communicate with other devices.
I introduce how to communicate with the Broker on the other devices that are connected to the LAN with specifying the IP address.
To check the IP address of the Broker (Windows PC), use the ipconfig command.
ipconfig
You will get the following log. (Excerpt)
Ethernet adapter Wireless Network Connection:

   Connection-specific DNS Suffix .:
   Link-local IPv6 address. . . . .:
   IPv4 address . . . . . . . . . .: 192.168.179.8  **** Use this one ****
   Subnet Mask  . . . . . . . . . .: 255.255.255.0
   Default Gateway  . . . . . . . .: 192.168.179.1
The line with ‘**** Use this one ****’ will be the IP address (will be different values depending on the environment).
Let’s try Publish/Subscribe from another Windows PC, or from another device with specifying the IP address of the Broker.
The mosquitto_pub and mosquitto_sub command have -h option for setting IP address and -p option for setting the port number. The default port number for Mosquitto is 1883 (following IP address is an example of my environment).
mosquitto_sub -d -h 192.168.179.8 -p 1883 -t topicA
mosquitto_pub -d -h 192.168.179.8 -p 1883 -t topicA -m "test"
If you find ‘test’ on the subscriber window, the communication was succeeded.
Ubuntu Linux, Raspberry Pi
This section describes how to install the Mosquitto to Ubuntu Linux or Raspberry Pi.
The installation is very easy, just run the following command.
sudo apt update
sudo apt upgrade -y
sudo apt install -y mosquitto mosquitto-clients
The execution confirmation command is the same as that described in for Windows PC.
To know the IP address command, type ifconfig.
ifconfig
Mac
On a Mac, install the Mosquitto with the following command.
brew install mosquitto
Add followings to the path.
/usr/local/opt/mosquitto/sbin
/usr/local/opt/mosquitto/bin
To know the IP address command, type ifconfig.
ifconfig
Android
If you want to use Android for operating other devices from mobile or tablet devices with a button, etc., using the MQTT Client application can easily realize.
MQTT Dash is stable and is recommended.
Stay the Broker on the PC up, etc. and open the MQTT Dash from an Android device.
Press the + button on the top right corner and enter the Name and Address (IP address of the Broker) as follows (following IP address is an example).
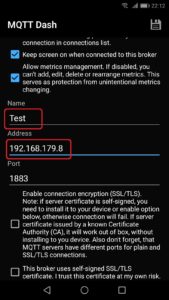
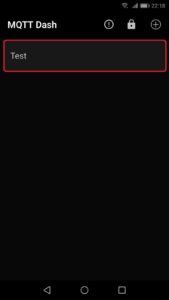
Press the save mark in the upper right corner. Since the new Client is created as follows and then tap it.
Press the + button on the top right corner, select the “Switch/button”, and enter the Name and Topic (sub).
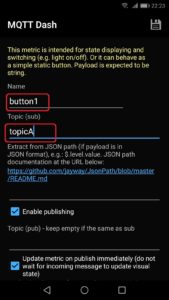
You can change the value for On/Off, the picture of the button, and the color.
The default value is 0 or 1, but you can change it to any number or string.
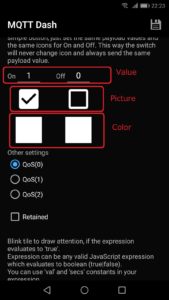
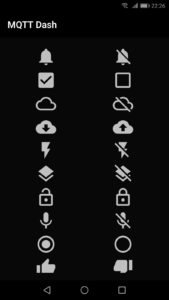
If you tap the picture, the following candidates are displayed and you can choose what you like.
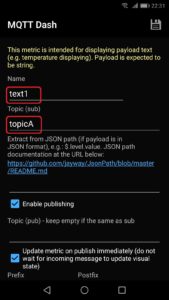
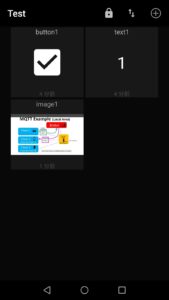
Similarly, add a “Text” to be displayed the Publish data.
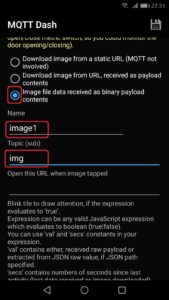
Furthermore, add the “Image” to be displayed the Publish image files.
Set ‘img’ as the topic name to distinguish them from those of the previous button.
Then you will see the button, text, and image blocks.
Please make sure that the value of the text value is changed to 0 or 1 after pressing the button.
Then let’s Publish an image from your PC with -h option to specify the IP address of the Broker (following IP address is an example).
mosquitto_pub -d -h 192.168.179.8 -p 1883 -t img -f MQTT.png
It is a success if the image is displayed as follows.
When you tap the unlock mark on the top, you can swap the location of the grabbed block with the long tap.
You can also change by selecting Edit after the long tap on an item when modifying an item has been set so far.
In addition, an Android device can be the MQTT Broker. MQTT Broker App is verified working.
The IP address of the Android device can be confirmed with the following.
Settings (Settings) → System (System) → terminal information (About phone) → state of the terminal (Status)
In addition, the Android terminal application Termux can run Mosquitto using the above Ubuntu Linux method.
At present, MQTT Dash for iPhone/iPad does not exist, but there seems to be similar applications.
Conclusion
This page showed how to do MQTT communication in a local environment with PC, Raspberry Pi, and Android smart phone/tablet.
In this page, easy MQTT communication was explained and the communication data were a plain text (not encrypted).
If you want to build the actual service, the data should be encrypted taking into account the security, and the Mosquitto has a function of encrypted communication.
Besides, if you build a Broker on the cloud server, the equipment can be operated remotely.
Bibliography
- MQTT Broker比較〜機能比較編(http://acro-engineer.hatenablog.com/entry/2015/06/19/120000)